Introduction
Did you know that 60% of security breaches are caused by mismanaged secrets? HashiCorp Vault provides a solution.
Managing secrets in Kubernetes can be a challenging, especially when it comes to ensuring that sensitive information is stored securely and accessed only by authorized users. One popular solution for managing secrets in Kubernetes is HashiCorp Vault, which provides a secure way to store and access secrets. In this blog post, we will explore how to integrate HashiCorp Vault with Kubernetes, We will cover the following topics:
- Setting up HashiCorp Vault
- Integrating Vault with Kubernetes
- Using Sidecar pattern to access secrets
Prerequisites
- 2 or more Kubernetes clusters
- One cluster will be used to deploy Vault
- The other cluster will be used to deploy the application that will access the secrets stored in Vault.
- kubectl installed and configured to access your cluster
- Helm installed
- vault CLI installed
Workflow diagram
The following diagram illustrates the architecture of the integration between HashiCorp Vault and Kubernetes. It shows how the application running in Kubernetes can access secrets stored
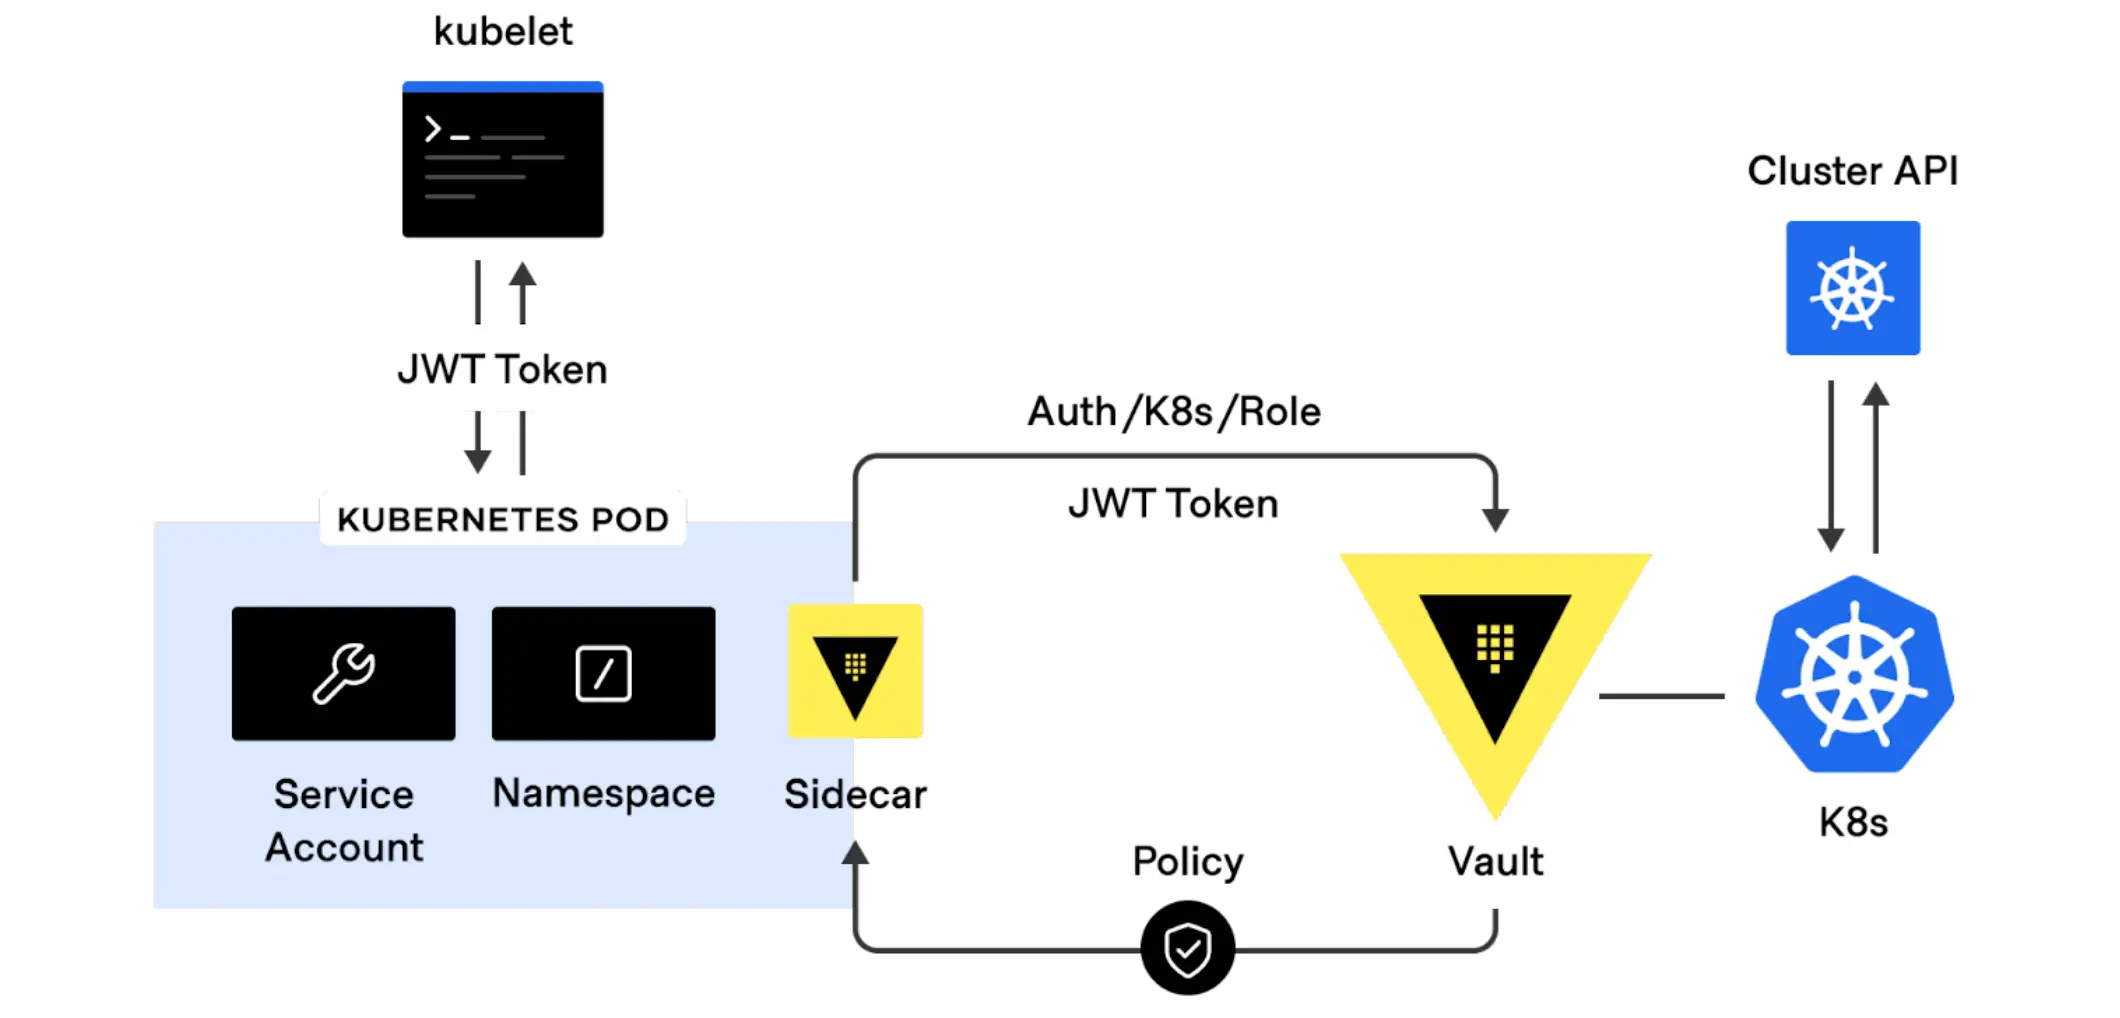
Source: Link
Install Vault in Kubernetes Cluster
Make sure your kubernetes context is set to the cluster where you want to deploy Vault.
# Set the context to the cluster where you want to deploy Vault
kubectl config use-context vault-cluster
$ helm repo add hashicorp https://helm.releases.hashicorp.com
"hashicorp" has been added to your repositories
create an override file for the helm chart
cat <<EOF > override.yaml
server:
  ingress:
    enabled: true
    annotations:
        cert-manager.io/cluster-issuer: letsencrypt-prod
    ingressClassName: "traefik"
    activeService: true
    hosts:
      - host: vault.example.com
        paths: []
    tls:
     - secretName: vault-tls
       hosts:
         - vault.example.com
this configuration will set one replica of vault server and expose it via ingress with TLS enabled and using letsencrypt. You can change the values according to your requirements. replace vault.example.com with your domain name. You can also use self-signed certificates for testing purposes.
you can find more details here
# Create Namespace for Vault
kubectl create namespace vault
# Install Vault using Helm
helm install vault hashicorp/vault -f override.yaml -n vault
Validate the Vault deployment
kubectl get pods -n vault
NAME                                    READY   STATUS    RESTARTS   AGE
vault-0                                 0/1     Running   0          65s
vault-agent-injector-56459c7545-j4pvg   1/1     Running   0          69s
Without initializing and unsealing vault, you will not be able to access the vault UI. To do that, we need to initialize and unseal the vault.
# Get the vault pod name
kubectl exec -it vault-0 -n vault -- sh
# Initialize Vault
vault operator init
This will generate Unseal Key and Root Token, keep them safe. You will need them to unseal the vault and access the vault UI.
To Unseal Vault, you need minimum of 3 unseal keys. You can use the following command to unseal the vault.
vault operator unseal <Unseal Key 1>
vault operator unseal <Unseal Key 2>
vault operator unseal <Unseal Key 3>
Check Vault status, it should be unsealed now.
vault status
Key             Value
---             -----
Seal Type       shamir
Initialized     true
Sealed          false
Total Shares    5
Threshold       3
Version         1.19.0
Build Date      2025-03-04T12:36:40Z
Storage Type    file
Cluster Name    vault-cluster-b2cdc155
Cluster ID      c197d82f-d790-8645-5a77-c3b4340b93b7
HA Enabled      false
kubectl get po,svc,ing -n vault
NAME                                        READY   STATUS    RESTARTS   AGE
pod/vault-0                                 1/1     Running   0          3m37s
pod/vault-agent-injector-56459c7545-j4pvg   1/1     Running   0          3m41s

NAME                               TYPE        CLUSTER-IP     EXTERNAL-IP   PORT(S)             AGE
service/vault                      ClusterIP   10.43.44.202   <none>        8200/TCP,8201/TCP   3m41s
service/vault-agent-injector-svc   ClusterIP   10.43.128.82   <none>        443/TCP             3m41s
service/vault-internal             ClusterIP   None           <none>        8200/TCP,8201/TCP   3m41s

NAME                              CLASS     HOSTS                  ADDRESS         PORTS     AGE
ingress.networking.k8s.io/vault   traefik   vault.example.com   172.31.86.147   80, 443   3m41s
Configure Vault
Login to the Vault using CLI
export VAULT_ADDR=https://vault.example.com
# Login
vault login -address=https://vault.avidhara.cloud
WARNING! VAULT_ADDR and -address unset. Defaulting to https://127.0.0.1:8200.
Token (will be hidden):
Pass your Root token to Login to Vault, Once you are able to login, you can run vault status to check the status of the vault.
vault status
Key             Value
---             -----
Seal Type       shamir
Initialized     true
Sealed          false
Total Shares    5
Threshold       3
Version         1.19.0
Build Date      2025-03-04T12:36:40Z
Storage Type    file
Cluster Name    vault-cluster-b2cdc155
Cluster ID      c197d82f-d790-8645-5a77-c3b4340b93b7
HA Enabled      false
Create an Readonly policy for the application to access secrets from vault.
cat <<EOF > read-policy.hcl
path "secret*" {
  capabilities = ["read","list"]
}
EOF
vault policy write read-policy read-policy.hcl
Success! Uploaded policy: read-policy
Check the Policy is creaed successfully, you should be able to see your policy read-policy in the list of policies.
vault vault policy list
default
read-policy
root
Integrate Vault with Kubernetes
To integrate Vault with Kubernetes, we need to enable the Kubernetes authentication method in Vault. This will allow Kubernetes to authenticate with Vault and access the secrets stored in it.
Create Service Account and Cluster Role Binding
Make sure your kubernetes context is set to the cluster where you are to deploy the application.
# Set the context to the cluster where you want to deploy the application
kubectl config use-context app-cluster
Create Service Account and Cluster Role Binding for the application to access the secrets from vault.
cat <<EOF > vault-sa.yaml
# Service Account for Vault auth
---
apiVersion: v1
kind: ServiceAccount
metadata:
  name: vault-auth
  namespace: default
# Service Account Token
---
apiVersion: v1
kind: Secret
metadata:
  name: vault-auth-token
  namespace: default
  annotations:
    kubernetes.io/service-account.name: vault-auth
type: kubernetes.io/service-account-token

# Create a ClusterRole for the Vault auth service account
---
apiVersion: rbac.authorization.k8s.io/v1
kind: ClusterRoleBinding
metadata:
  name: role-tokenreview-binding
  namespace: default
roleRef:
  apiGroup: rbac.authorization.k8s.io
  kind: ClusterRole
  name: system:auth-delegator
subjects:
- kind: ServiceAccount
  name: vault-auth
  namespace: default
EOF
kubectl apply -f vault-sa.yaml
Get SA token and CA certificate from Service Account secret.
# Set SA_JWT_TOKEN value to the service account JWT used to access the TokenReview API
export SA_JWT_TOKEN=$(kubectl -n default get secret vault-auth-token -o jsonpath="{.data.token}" | base64 --decode; echo)

# Set SA_CA_CRT to the PEM encoded CA cert used to talk to Kubernetes API
export SA_CA_CRT=$(kubectl -n default get secret vault-auth-token -o jsonpath="{.data['ca\.crt']}" | base64 --decode; echo)
# Set K8S_HOST to the Kubernetes API server URL
export K8S_HOST=$(kubectl config view --minify -o jsonpath='{.clusters[0].cluster.server}')
Enable Kubernetes authentication method in Vault
vault auth enable kubernetes
Success! Enabled kubernetes auth method at: kubernetes/
Check the authentication method is enabled successfully.
vault auth list
Path           Type          Accessor                    Description                Version
----           ----          --------                    -----------                -------
kubernetes/    kubernetes    auth_kubernetes_53ef57f7    n/a                        n/a
token/         token         auth_token_c40da6fa         token based credentials    n/a
Configure Kubernetes Authentication Method
Configure the Kubernetes authentication method with the service account token and CA certificate.
vault write auth/kubernetes/config \
        token_reviewer_jwt="$SA_JWT_TOKEN" \
        kubernetes_host="$K8S_HOST" \
        kubernetes_ca_cert="$SA_CA_CRT"
Success! Data written to: auth/kubernetes/config
This will configure the Kubernetes authentication method with the service account token and CA certificate. You can check the configuration using the following command.
Create a Role for the Application
Create a role for the application to access the secrets from vault. This role will bind the service account to the policy created earlier.
vault write auth/kubernetes/role/vault-test \
        bound_service_account_names=default \
        bound_service_account_namespaces='*' \
        policies=read-policy \
        ttl=1440h
This will create a role vault-test which will bind the service account default to the policy read-policy. You can change the values according to your requirements.
Create a Secrets in Vault
Create a secret in vault to test the integration. You can create a secret using the following command.
# Enable KV secrets engine
vault secrets enable -path=secret kv
Success! Enabled the kv secrets engine at: secret/
# Create a secret
vault kv put secret/mysecret username=admin password=admin123
validate the secret is created successfully.
vault kv list secret
Keys
----
mysecret
Access to secrets in app-cluster
Deploy an application in the app-cluster to access the secrets from vault. You can use the following deployment file to deploy an application.
cat <<EOF > deploy.yaml
apiVersion: apps/v1
kind: Deployment
metadata:
  annotations:
  creationTimestamp: null
  generation: 1
  labels:
    app: debugging-tools
  name: debugging-tools
spec:
  progressDeadlineSeconds: 600
  replicas: 1
  revisionHistoryLimit: 10
  selector:
    matchLabels:
      app: debugging-tools
  strategy:
    rollingUpdate:
      maxSurge: 25%
      maxUnavailable: 25%
    type: RollingUpdate
  template:
    metadata:
      creationTimestamp: null
      labels:
        app: debugging-tools
    spec:
      containers:
      - command:
        - tail
        - -f
        - /dev/null
        image: armory/debugging-tools:latest
        imagePullPolicy: Always
        name: debugging-tools
        resources: {}
        terminationMessagePath: /dev/termination-log
        terminationMessagePolicy: File
      dnsPolicy: ClusterFirst
      restartPolicy: Always
      schedulerName: default-scheduler
      securityContext: {}
      terminationGracePeriodSeconds: 30
EOF
kubectl create -f deploy.yaml
Wait till the pod is in Running State
kubectl get pods
NAME                               READY   STATUS    RESTARTS   AGE
debugging-tools-6cfb7598bf-q2hrj   1/1     Running   0          166m
SSH into the debugging-tools pod
k exec -it debugging-tools-6cfb7598bf-q2hrj -- bash
bash: /etc/profile.d/bash_completion.sh: No such file or directory
debugging-tools-6cfb7598bf-q2hrj:/#
Get the Auth Token from Vault using the following command.
export VAULT_ADDR=https://vault.example.com
# Get the Service Account Token
SA_TOKEN=$(cat /var/run/secrets/kubernetes.io/serviceaccount/token)
# Get Vault Token for the Role associated with the Service Account(Default)
vault write auth/kubernetes/login role=vault-test jwt=$SA_TOKEN

WARNING! The following warnings were returned from Vault:

  * TTL of "1440h" exceeded the effective max_ttl of "768h"; TTL value is
  capped accordingly

Key                                       Value
---                                       -----
token                                     xxxxxxxxxxxxxx
token_accessor                            QgcSOq1dHmVXIZZMnX4bBAwy
token_duration                            768h
token_renewable                           true
token_policies                            ["default" "read-policy"]
identity_policies                         []
policies                                  ["default" "read-policy"]
token_meta_role                           vault-test
token_meta_service_account_name           default
token_meta_service_account_namespace      default
token_meta_service_account_secret_name    n/a
token_meta_service_account_uid            ddf8c493-6787-4f63-ab02-ea3a9a322ac1

# Login to Vault
vault login vault.example.com
Success! You are now authenticated. The token information displayed below
is already stored in the token helper. You do NOT need to run "vault login"
again. Future Vault requests will automatically use this token.

Key                                       Value
---                                       -----
token                                     xxxxxxxxxxx
token_accessor                            QgcSOq1dHmVXIZZMnX4bBAwy
token_duration                            767h59m35s
token_renewable                           true
token_policies                            ["default" "read-policy"]
identity_policies                         []
policies                                  ["default" "read-policy"]
token_meta_service_account_uid            ddf8c493-6787-4f63-ab02-ea3a9a322ac1
token_meta_role                           vault-test
token_meta_service_account_name           default
token_meta_service_account_namespace      default
token_meta_service_account_secret_name    n/a
Once you Logged into the Vault you should be able to see the the secret created earlier based on the policy associated with the role.
vault kv list secret
Keys
----
mysecret
vault kv get secret/mysecret
====== Data ======
Key         Value
---         -----
password    admin123
username    admin
Accessing Secrets using Sidecar Pattern
The sidecar pattern is a common way to access secrets from Vault in Kubernetes. In this pattern, a sidecar container is deployed alongside the main application container. The sidecar container is responsible for fetching the secrets from Vault and making them available to the main application container. The sidecar container can be configured to run a Vault agent that will authenticate with Vault and fetch the secrets. The secrets can then be made available to the main application container through a shared volume.
apiVersion: apps/v1
kind: Deployment
metadata:
  name: vault-sidecar
spec:
    replicas: 1
    selector:
        matchLabels:
        app: vault-sidecar
    template:
        metadata:
        labels:
            app: vault-sidecar
        spec:
        containers:
        - name: nginx
            image: nginx:latest
            volumeMounts:
            - name: secret-volume
            mountPath: /mnt/secrets
        - name: vault-agent
            image: vault:latest
            command: ["vault", "agent", "-config=/etc/vault/config.hcl"]
            volumeMounts:
            - name: secret-volume
            mountPath: /mnt/secrets
            - name: config-volume
            mountPath: /etc/vault
        volumes:
        - name: secret-volume
            emptyDir: {}
        - name: config-volume
            configMap:
            name: vault-config
---
apiVersion: v1
kind: ConfigMap
metadata:
    name: vault-config
data:
    config.hcl: |
        exit_after_auth = false
        pid_file = "/tmp/vault.pid"
        auto_auth {
            method "kubernetes" {
                mount_path = "kubernetes"
                config = {
                    role = "vault-test"
                    service_account_name = "vault-auth"
                    kubernetes_host = "$K8S_HOST"
                    kubernetes_ca_cert = "$SA_CA_CRT"
                }
            }
            sink "file" {
                config = {
                    path = "/mnt/secrets/token"
                }
            }
        }
In this example, the main application container is myapp:latest and the sidecar container is vault:latest. The sidecar container is configured to run a Vault agent that will authenticate with Vault using the Kubernetes authentication method and fetch the secrets. The secrets are then made available to the main application container through a shared volume /mnt/secrets.
The sidecar pattern is a powerful way to access secrets from Vault in Kubernetes. It allows you to decouple the secret management from the application code and provides a secure way to access secrets.
Accessing Secrets using Vault Agent Injector
The Vault Agent Injector is a Kubernetes controller that automatically injects Vault agent sidecars into your pods. This allows you to access secrets from Vault without having to modify your application code or deployment files.
To use the Vault Agent Injector, you need to annotate your pod with the vault.hashicorp.com/agent-inject annotation. The Vault Agent Injector will then automatically inject a Vault agent sidecar into your pod.
apiVersion: apps/v1
kind: Deployment
metadata:
  name: vault-agent-injector
spec:
    replicas: 1
    selector:
        matchLabels:
        app: vault-agent-injector
    template:
        metadata:
        labels:
            app: vault-agent-injector
        annotations:
            vault.hashicorp.com/agent-inject: "true"
            vault.hashicorp.com/role: "vault-test"
            vault.hashicorp.com/agent-inject-secret-mysecret: "secret/mysecret"
        spec:
        containers:
        - name: nginx
            image: nginx:latest
            volumeMounts:
            - name: secret-volume
            mountPath: /mnt/secrets
        - name: vault-agent
            image: vault:latest
            command: ["vault", "agent", "-config=/etc/vault/config.hcl"]
            volumeMounts:
            - name: secret-volume
            mountPath: /mnt/secrets
        volumes:
        - name: secret-volume
            emptyDir: {}
In this example, the vault.hashicorp.com/agent-inject annotation is set to true, which tells the Vault Agent Injector to inject a Vault agent sidecar into the pod. The vault.hashicorp.com/role annotation specifies the role that the Vault agent should use to authenticate with Vault. The vault.hashicorp.com/agent-inject-secret-mysecret annotation specifies the secret that should be injected into the pod.
The Vault Agent Injector will automatically inject the Vault agent sidecar into the pod and fetch the secret from Vault. The secret will be available in the /mnt/secrets directory in the main application container.
Compassion between Sidecar, CSI and ESO
Here’s a comparison of the Sidecar Pattern, CSI Driver, and External Secrets Operator to help you choose the best approach for your use case
| Feature | Sidecar Pattern | CSI Driver | External Secrets Operator |
|---|---|---|---|
| Authentication Method | Kubernetes | Kubernetes | Kubernetes |
| Secret Injection | Shared Volume | Volume | Kubernetes Secrets |
| Configuration | Pod Annotations | Volume | Custom Resource |
| Secret Rotation | Manual | Automatic | Automatic |
| Complexity | Medium | High | Low |
| Use Case | Dynamic Secrets | Static Secrets | Dynamic Secrets |
| Performance | High | Medium | High |
| Security | High | High | High |
| Flexibility | High | Medium | High |
| Community Support | High | Medium | High |
| Learning Curve | Medium | High | Low |
| Integration with Vault | High | High | High |
| Integration with Kubernetes | High | High | High |
| Integration with Other Tools | Medium | High | High |
| Documentation | Medium | High | High |
| Ecosystem | Kubernetes | Kubernetes | Kubernetes |
| Support | Community | Community | Community |
| Cost | Low | Medium | Low |
| Scalability | High | Medium | High |
| Maintenance | Medium | High | Low |
Conclusion
Integrating HashiCorp Vault with Kubernetes provides a secure, scalable, and flexible way to manage secrets in cloud-native environments. In this guide, we explored multiple approaches to accessing secrets from Vault in Kubernetes, including the Sidecar Pattern, CSI Driver, and External Secrets Operator (ESO). Each method has its own strengths and use cases, allowing you to choose the best approach based on your application requirements.
We covered:
- Setting up Vault in a Kubernetes cluster with Helm and configuring it for secure access.
- Using the Sidecar Pattern to inject secrets into application pods via shared volumes.
- Leveraging the Vault Agent Injector for seamless secret injection without modifying application code.
- Comparing the Sidecar Pattern, CSI Driver, and ESO to highlight their differences in complexity, performance, and flexibility.
By implementing these patterns, you can ensure that sensitive data is securely managed and accessed by your applications, while also simplifying secret rotation and reducing operational overhead.
Join the Conversation:
Which method worked best for your use case? Share your experience in the comments below or reach out to us with questions. Let’s build secure and scalable Kubernetes environments together!
Feel free to explore additional features of Vault, such as dynamic secrets, secret revocation, and integration with other secret management systems. For more details, refer to the HashiCorp Vault Documentation.
Happy Kubernetes-ing! 🚀