Introduction
Managing multiple Kubernetes clusters can be complex and time-consuming. Fleet simplifies this process with GitOps-based automation, enabling seamless multi-cluster management.
Fleet is a GitOps-based continuous delivery tool for Kubernetes clusters. It is designed to manage the deployment of applications and configurations across multiple clusters, making it an ideal solution for organizations that operate at scale. Fleet provides a unified way to manage your Kubernetes resources, ensuring that your resources are always in the desired state.
Key Features
- GitOps-based: Fleet uses Git as the source of truth for your cluster configurations, allowing you to manage your clusters using familiar Git workflows.
- Multi-cluster management: Fleet can manage thousands of clusters, making it ideal for organizations with large-scale Kubernetes deployments.
- Declarative configuration: Fleet allows you to define your desired state for your clusters using YAML files, making it easy to version control and manage your configurations.
- Integration with Rancher and RKE2: Fleet is built on top of Rancher and RKE2, providing a seamless experience for managing your Kubernetes clusters.
- Continuous delivery: Fleet automatically applies your configurations to your clusters, ensuring that they are always in the desired state.
Architecture
Fleet consists of several components that work together to provide a unified way to manage your Kubernetes clusters. The key components of Fleet include:
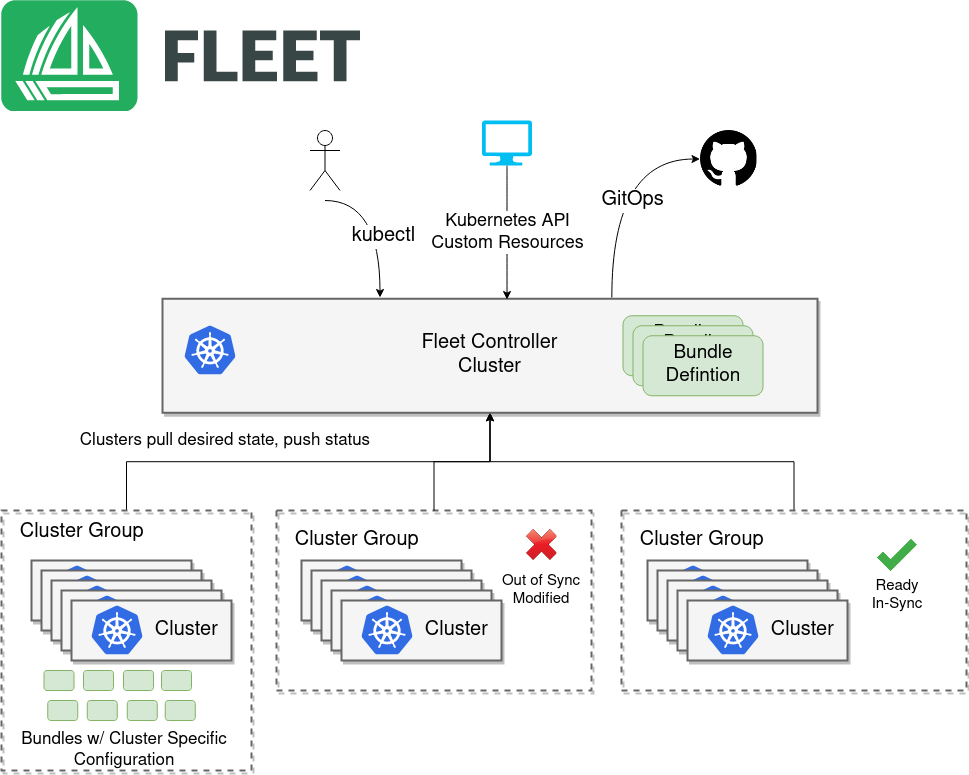
- Fleet Controller: The Fleet Controller is responsible for managing the state of your clusters. It monitors your Git repository for changes and applies those changes to your clusters.
- Fleet Agent: The Fleet Agent is deployed on each of your clusters and is responsible for applying the configurations defined in your Git repository to the cluster. It communicates with the Fleet Controller to receive updates and report the status of the cluster.
- GitJob: GitJob is a Kubernetes custom resource that represents a job that runs in your cluster. It is used to manage the deployment of applications and configurations to your clusters.

Installation
Fleet can be installed using Helm, a popular package manager for Kubernetes. The installation process involves adding the Fleet Helm repository, installing the Fleet CRDs (Custom Resource Definitions), and then installing Fleet itself.
pre-requisites
- 2 or more Kubernetes clusters
- 1 management cluster
- 1 downstream cluster
- kubectl installed and configured to access your cluster
- Helm installed
Deploy Fleet Manager to support Mutli Cluster deployment
Make sure your configuration context set to the management cluster.
# Check the current context
kubectl config current-context
# Set the context to the management cluster
kubectl config use-context <management-cluster-context>
Extract the CA certificate from the management cluster and save it to a file called ca.pem:
kubectl config view -o json --raw  | jq -r '.clusters[].cluster["certificate-authority-data"]' | base64 -d > ca.pem

API_SERVER_CA="ca.pem"
Extract the API server URL from the management cluster(Fleet controller):
API_SERVER_URL=$(kubectl config view -o json --raw | jq -r '.clusters[] | select(.name=="default").cluster["server"]')
validate the ca cert
# Validate the CA certificate
curl -fL --cacert "$API_SERVER_CA" "$API_SERVER_URL/version"
If you are getting 401 error, we should be good to go.
# Add the Fleet Helm repository
helm repo add fleet https://rancher.github.io/fleet-helm-charts/
"fleet" has been added to your repositories
# Install Fleet CRDs
helm -n cattle-fleet-system install --create-namespace --wait fleet-crd \
    fleet/fleet-crd
NAME: fleet-crd
LAST DEPLOYED: Tue Apr 22 00:12:42 2025
NAMESPACE: cattle-fleet-system
STATUS: deployed
REVISION: 1
TEST SUITE: None

### Install Fleet
helm -n cattle-fleet-system install --create-namespace --wait fleet \
    fleet/fleet
NAME: fleet
LAST DEPLOYED: Tue Apr 22 00:12:59 2025
NAMESPACE: cattle-fleet-system
STATUS: deployed
REVISION: 1
TEST SUITE: None
Verify the installation
# Check the status of the Fleet components
kubectl get pods -n cattle-fleet-system
NAME                               READY   STATUS    RESTARTS   AGE
fleet-agent-6cfd675dc4-vpmbb       1/1     Running   0          13s
fleet-controller-8bf79cc4b-hfgts   3/3     Running   0          31s
gitjob-5f545884fc-ngprk            1/1     Running   0          31s

kubectl get svc -n cattle-fleet-system
NAME                          TYPE        CLUSTER-IP       EXTERNAL-IP   PORT(S)    AGE
gitjob                        ClusterIP   10.105.218.209   <none>        80/TCP     78s
monitoring-fleet-controller   ClusterIP   10.98.137.109    <none>        8080/TCP   78s
monitoring-gitjob             ClusterIP   10.97.173.80     <none>        8081/TCP   78s
Using Fleet for Continuous Delivery
Once Fleet is installed, you can start using it to manage your Kubernetes clusters. The first step is to create a Git repository that will serve as the source of truth for your cluster configurations. You can define your desired state for your clusters using YAML files and commit those files to your Git repository. Fleet will automatically monitor your Git repository for changes and apply those changes to your clusters. This approach ensures that your clusters are always in sync with your desired state, reducing the risk of configuration drift and making it easier to manage large numbers of clusters.
Example
cat > example.yaml << "EOF"
kind: GitRepo
apiVersion: fleet.cattle.io/v1alpha1
metadata:
  name: simple-namespace
  namespace: fleet-local
spec:
  repo: https://github.com/rajivreddy/fleet-examples.git
  branch: main
  paths:
  - namespace
EOF

kubectl apply -f example.yaml

gitrepo.fleet.cattle.io/sample created
Above example deploys the namespace.yaml file from the Git repository to the management cluster. The namespace.yaml file contains the definition of the namespace that you want to create in your cluster.
Check the status of the GitRepo:
# Check the status of the GitRepo
kubectl get gitrepo  -n fleet-local
NAME               REPO                                               COMMIT                                     BUNDLEDEPLOYMENTS-READY   STATUS
simple-namespace   https://github.com/rajivreddy/fleet-examples.git   cf4faf61e442044bcf3464145d2d5b9158457211   1/1

### check the resources created in the cluster(namespace)
NAME                                     STATUS   AGE
cattle-fleet-clusters-system             Active   16m
cattle-fleet-system                      Active   17m
cluster-fleet-local-local-1a3d67d0a899   Active   16m
default                                  Active   14d
fleet-local                              Active   16m
fleet-manifest-example                   Active   4m14s
kube-node-lease                          Active   14d
kube-public                              Active   14d
kube-system                              Active   14d
monitoring                               Active   9s
Check the resources bundle created in the cluster
# Check the status of the Bundle
kubectl get bundles.fleet.cattle.io -n fleet-local
NAME                         BUNDLEDEPLOYMENTS-READY   STATUS
fleet-agent-local            1/1
simple-namespace-namespace   1/1
# Check the status of the BundleDeployment
kubectl getbundles.fleet.cattle.io simple-namespace-namespace -n fleet-local -o yaml
apiVersion: fleet.cattle.io/v1alpha1
kind: Bundle
metadata:
  creationTimestamp: "2025-04-21T18:59:55Z"
  finalizers:
  - fleet.cattle.io/bundle-finalizer
  generation: 1
  labels:
    fleet.cattle.io/commit: cf4faf61e442044bcf3464145d2d5b9158457211
    fleet.cattle.io/repo-name: simple-namespace
  name: simple-namespace-namespace
  namespace: fleet-local
  resourceVersion: "221507"
  uid: 0cecf7b3-a0fd-472a-a1dd-87845ceb501e
spec:
  ignore: {}
  resources:
  - content: |
      apiVersion: v1
      kind: Namespace
      metadata:
        name: monitoring
        annotations:
          owner: "DevOps Team"
    name: namespace.yaml
  targetRestrictions:
  - clusterGroup: default
    name: default
  targets:
  - clusterGroup: default
    ignore: {}
    name: default
kubectl get clusters.fleet.cattle.io -A
NAMESPACE     NAME    BUNDLES-READY   LAST-SEEN              STATUS
fleet-local   local   2/2             2025-04-21T18:58:30Z

kubectl get clustergroups.fleet.cattle.io -A
NAMESPACE     NAME      CLUSTERS-READY   BUNDLES-READY   STATUS
fleet-local   default   1/1              2/2
Multi Cluster Deployment with Fleet
Prerequisites
- A management cluster with Fleet installed
- A downstream cluster that you want to register with Fleet Agent
Cluster Registration Tokens
To register a downstream cluster with Fleet, you need to create a registration token. This token is used to authenticate the downstream cluster with the Fleet server.
Registering an Downstream cluster
Assuming you are trying to register a downstream cluster to the fleet server without Rancher, you can do so by running the following command:
Make sure your kubernetes context is set to management cluster.
cat > registration-token.yaml << "EOF"
kind: ClusterRegistrationToken
apiVersion: "fleet.cattle.io/v1alpha1"
metadata:
    name: new-token
spec:
    # A duration string for how long this token is valid for. A value <= 0 or null means infinite time.
    ttl: 240h
This will create an Kubernetes secret
kubectl get secret new-token;
NAME        TYPE                                          DATA   AGE
new-token   fleet.cattle.io/cluster-registration-values   1      3h36m
kubectl get secret new-token -o 'jsonpath={.data.values}' | base64 --decode > values.yaml
values.yaml file contains the registration token and other information required to register the downstream cluster with Fleet.
update your values.yaml with additional labels, these labels will be used to identify the downstream cluster in Fleet to deploy the resources.
cat >> values.yaml << "EOF"
labels:
  env: dev
  type: edge
EOF
# Add the Fleet Agent Helm repository
helm repo add fleet https://rancher.github.io/fleet-helm-charts/
Deploy Fleet Agent to the downstream cluster, Make sure your kubernetes context is set to downstream cluster.
# Install the Fleet Agent on the downstream cluster
helm -n cattle-fleet-system install --create-namespace --wait \
    --values values.yaml fleet-agent fleet/fleet-agent
NAME: fleet-agent
LAST DEPLOYED: Tue Apr 22 10:59:49 2025
NAMESPACE: cattle-fleet-system
STATUS: deployed
REVISION: 1
TEST SUITE: None
Validate Fleet agent Deployments
# Ensure kubectl is pointing to the right cluster
kubectl -n cattle-fleet-system logs -l app=fleet-agent

I0422 05:22:48.178982       1 leaderelection.go:257] attempting to acquire leader lease cattle-fleet-system/fleet-agent...
I0422 05:22:48.191063       1 leaderelection.go:271] successfully acquired lease cattle-fleet-system/fleet-agent
{"level":"info","ts":"2025-04-22T05:22:48Z","logger":"setup","msg":"renewed leader","identity":"fleet-agent-f966bf5d4-hmjql-1"}
{"level":"info","ts":"2025-04-22T05:22:48Z","logger":"setup","msg":"starting registration on upstream cluster","namespace":"cattle-fleet-system"}
time="2025-04-22T05:22:48Z" level=warning msg="Cannot find fleet-agent secret, running registration"
time="2025-04-22T05:22:48Z" level=error msg="Failed to register agent: registration failed: unable to load root certificates: unable to parse bytes as PEM block"

kubectl -n cattle-fleet-system get pods -l app=fleet-agent
NAME                          READY   STATUS    RESTARTS   AGE
fleet-agent-f966bf5d4-hmjql   1/1     Running   0          56s
Check cluster registration status with Management cluster
once fleet agent is installed, you can check the status of the downstream cluster registerd with management cluster using kubectl commands.
 kubectl get clusters -A
NAMESPACE     NAME                   BUNDLES-READY   LAST-SEEN              STATUS
default       cluster-96470c058b92   1/1             2025-04-22T05:31:16Z
fleet-local   local                  1/1             2025-04-22T05:24:39Z
your downstream cluster is now registered with the Fleet server and is ready to receive configurations from your Git repository.
Now lets deploy the same example.yaml file to the downstream cluster.
cat > example2.yaml << "EOF"
kind: GitRepo
apiVersion: fleet.cattle.io/v1alpha1
metadata:
  name: downstream-cluster-example
spec:
  repo: https://github.com/rajivreddy/fleet-examples.git
  branch: main
  paths:
  - namespace
  targets:
  - name: dev
    clusterSelector:
      matchLabels:
        env: dev
EOF

kubectl apply -f example2.yaml
kg gitrepo -A
NAMESPACE   NAME                         REPO                                               COMMIT                                     BUNDLEDEPLOYMENTS-READY   STATUS
default     downstream-cluster-example   https://github.com/rajivreddy/fleet-examples.git   cf4faf61e442044bcf3464145d2d5b9158457211   1/1
kg ns
NAME                  STATUS   AGE
cattle-fleet-system   Active   35m
default               Active   45m
kube-node-lease       Active   45m
kube-public           Active   45m
kube-system           Active   45m
monitoring            Active   9s
Deploy External Helm repositories
Fleet supports deploying applications from external Helm repositories. This feature allows you to leverage existing Helm charts and deploy them to your clusters using Fleet. To deploy an external Helm repository, you need to create a Git repository that contains the Helm chart and then create a GitRepo resource in Fleet that points to that repository.
Example:
cat > external-helm-repo.yaml << "EOF"
kind: GitRepo
apiVersion: fleet.cattle.io/v1alpha1
metadata:
  name: helm-external
  namespace: fleet-default
spec:
  repo: https://github.com/rajivreddy/fleet-examples.git
  branch: main
  paths:
  - external-helm
  targets:
  - name: edge
    clusterSelector:
      matchLabels:
        env: dev
EOF
this will deploy Bitnami Nginx helm chart to the downstream cluster with the label env: dev.
Target Customization with Fleet
Fleet provides a powerful way to customize the deployment of your applications and configurations across multiple clusters. You can define target restrictions in your Git repository to specify which clusters should receive specific configurations. This allows you to tailor your deployments to the unique needs of each cluster, ensuring that your applications are deployed in the most efficient way possible.
Example: you need to define target restrictions in your fleet configuration. This allows you to specify which clusters should receive specific configurations, making it easy to tailor your deployments to the unique needs of each cluster.
cat > target-customization.yaml << "EOF"
defaultNamespace: nginx
helm:
  repo: https://charts.bitnami.com/bitnami
  chart: nginx
  releaseName: nginx
  version: 19.0.2

targetCustomizations:
- name: edge
  helm:
    valuesFiles:
    - dev.yaml
  clusterSelector:
    matchLabels:
      type: edge
- name: alpha
  helm:
    valuesFiles:
    - stage.yaml
  clusterSelector:
    matchLabels:
      type: alpha
EOF

cat > git-repo.yaml << "EOF"
kind: GitRepo
apiVersion: fleet.cattle.io/v1alpha1
metadata:
  name: helm-external
  namespace: fleet-default
spec:
  repo: https://github.com/rajivreddy/fleet-examples.git
  branch: main
  paths:
  - external-helm
  targets:
  - name: edge
    clusterSelector:
      matchLabels:
        type: edge
  - name: alpha
    clusterSelector:
      matchLabels:
        type: alpha
EOF
In above example, we have defined two target customizations: one for edge clusters and one for alpha clusters. Each target customization specifies a different values file to be used when deploying the Helm chart. This allows you to tailor your deployments to the unique needs of each cluster, ensuring that your applications are deployed in the most efficient way possible.
Repo Link
Conclusion
In this guide, we explored how Fleet enables seamless continuous delivery, from registering downstream clusters to deploying applications using Git repositories and Helm charts. By using Fleet, you can ensure consistency, reduce configuration drift, and tailor deployments to meet the unique needs of each cluster.
Key Takeaways:
- Fleet provides a unified way to manage thousands of Kubernetes clusters with Git as the single source of truth.
- It supports advanced features like target customization, enabling precise control over deployments across different environments.
- Integration with external Helm repositories allows you to leverage existing charts for efficient application delivery.
Whether you’re managing edge clusters, staging environments, or production workloads, Fleet empowers you to scale with confidence while maintaining declarative, version-controlled configurations.
“What challenges have you faced with multi-cluster Kubernetes management? Share your experience in the comments below—we’d love to hear from you!” and which GitOps tools have you used in your Kubernetes journey?
Feel free to reach out if you have any questions or need further assistance with Fleet or Kubernetes in general. Your feedback and insights are invaluable to us as we continue to explore the world of Kubernetes and its ecosystem.
If you found this guide helpful, please consider sharing it with your colleagues or on social media. Together, we can build a community of Kubernetes enthusiasts who are passionate about continuous delivery and multi-cluster management.
Happy Kubernetes-ing! 🚀