Introduction
External Secrets Operator (ESO) is a Kubernetes operator that allows you to use external secret management systems, such as AWS Secrets Manager, HashiCorp Vault, and Azure Key Vault, to manage secrets in your Kubernetes cluster. It provides a way to synchronize secrets from these external systems into Kubernetes secrets, making it easier to manage and use secrets in your applications.
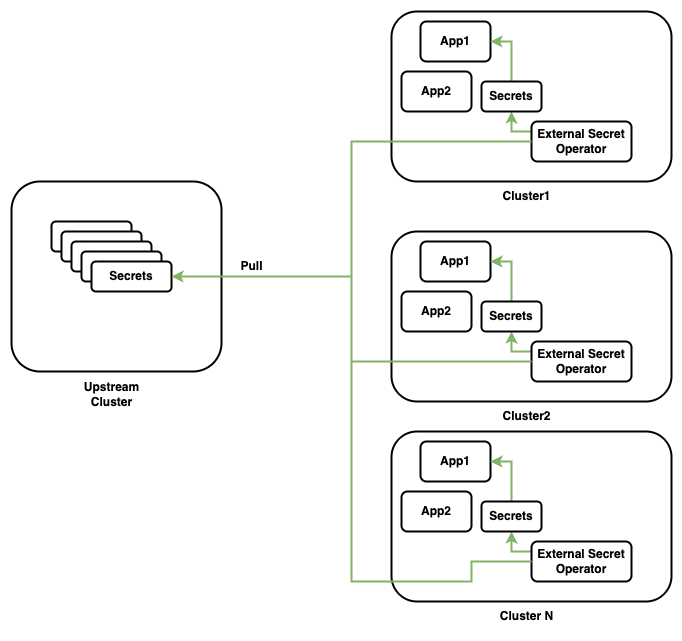
In this guide, we will demonstrate how to use the External Secrets Operator to synchronize secrets from one Kubernetes cluster (Cluster 1(Upstream Cluster)) to another (Cluster 2,(Downstream Cluster/s)). This is particularly useful when you want to share secrets between different clusters or environments.
Prerequisites
- 2 Kubernetes clusters (e.g., k3s, EKS, GKE, AKS)
- Cluster 1: Use as Secrets provider
- Cluster 2: Use as Secrets consumer
- kubectl installed and configured to access the clusters
- Helm installed
Architecture
Deploying External Secret Operator in Cluster 2
We will be deploying ESO to the second cluster (Cluster 2) where we want to use the secrets from the first cluster (Cluster 1).
# Add the ESO Helm repository
helm repo add external-secrets https://charts.external-secrets.io\n
# Create a namespace for ESO
kubectl create namespace external-secrets
# Install ESO using Helm
helm install external-secrets external-secrets/external-secrets  --namespace=external-secrets   --create-namespace
Wait till the ESO pods are up and running. You can check the status of the pods using the following command:
# Verify the installation
kubectl get po,nodes,svc -n external-secrets
NAME                                                    READY   STATUS    RESTARTS   AGE
pod/external-secrets-9c44fbf86-mnxk4                    1/1     Running   0          166m
pod/external-secrets-cert-controller-7cdbbbd6d5-6jv7d   1/1     Running   0          166m
pod/external-secrets-webhook-cbbb45647-rzpzq            1/1     Running   0          166m

NAME                    STATUS   ROLES                              AGE     VERSION
node/ip-172-31-92-184   Ready    control-plane,etcd,master,worker   3h20m   v1.32.3+k3s1

NAME                               TYPE        CLUSTER-IP      EXTERNAL-IP   PORT(S)   AGE
service/external-secrets-webhook   ClusterIP   10.43.157.109   <none>        443/TCP   166m
Create a Kubernetes Secret in Cluster 1
In Cluster 1, create a Kubernetes secret that you want to synchronize to Cluster 2. For example, let’s create a secret named user-credentials in the default namespace.
# Create a secret in Cluster 1
cat <<-EOF | kubectl apply -f -
apiVersion: v1
kind: Secret
metadata:
  name: user-credentials
type: Opaque
stringData:
  username: peter
  password: asdf1234
EOF
Create RBAC configuration in Cluster1
We need an Service Account to access the secret in Cluster 1. Create a Service Account and a RoleBinding to allow the Service Account to access secrets in the default namespace.
cat <<-EOF | kubectl apply -f -
# remote-cluster.yaml
apiVersion: v1
kind: ServiceAccount
metadata:
  name: eso-reader
  namespace: default
---
apiVersion: rbac.authorization.k8s.io/v1
kind: Role
metadata:
  name: eso-secret-reader
  namespace: default
rules:
- apiGroups: [""]
  resources:
  - secrets
  verbs:
  - get
  - list
  - watch
- apiGroups:
  - authorization.k8s.io
  resources:
  - selfsubjectrulesreviews
  verbs:
  - create
---
apiVersion: rbac.authorization.k8s.io/v1
kind: RoleBinding
metadata:
  name: eso-secret-reader-binding
  namespace: default
subjects:
  - kind: ServiceAccount
    name: eso-reader
roleRef:
  kind: Role
  name: eso-secret-reader
  apiGroup: rbac.authorization.k8s.io
---
apiVersion: v1
kind: Secret
metadata:
  name: eso-reader-token
  namespace: default
  annotations:
    kubernetes.io/service-account.name: eso-reader
type: kubernetes.io/service-account-token
EOF
Above RBAC configuration creates a Service Account named eso-reader in the default namespace, a Role named eso-secret-reader that allows access to secrets, and a RoleBinding that binds the Service Account to the Role. This Role allows to Pull the secrets from the default namespace.
Extract the static service account token from the remote cluster
# Extract the token value
kubectl get secrets eso-reader-token -o jsonpath='{.data.token}' | base64 -d > eso/token.txt
# Extract the CA cert
kubectl get secrets eso-reader-token -o jsonpath='{.data.ca\.crt}' | base64 -d > eso/ca.crt
# Get the API server address
kubectl config view --minify -o jsonpath='{.clusters[0].cluster.server}'
Configure the ESO in Cluster 2
To pull the secrets from Cluster 1, we need to create SecretStore. with in SecretStore we need to add the Cluster1 URL, Service Account Token and CA cert of Cluster 1.
# create Kubernetes Secret
kubectl -n default create secret generic remote-sa-token --from-literal=token="$(cat ./eso/token.txt)" --dry-run=client -o yaml | kubectl apply -f -
# Create Configmap with CA cert
kubectl create cm kube-root-remote-ca.crt --from-file eso/ca.crt
Once the secret and configmap are created, we can create the SecretStore resource.
cat <<-EOF | kubectl apply -f -
apiVersion: external-secrets.io/v1beta1
kind: SecretStore
metadata:
  name: remote-k8s-store
  namespace: default
spec:
  provider:
    kubernetes:
      server:
        url: https://172.31.86.147:6443
        caProvider:
          type: ConfigMap
          name: kube-root-remote-ca.crt
          key: ca.crt
      remoteNamespace: default
      auth:
        token:
          bearerToken:
            name: remote-sa-token
            key: token
EOF
Verify the status of SecretStore resource, it should be in Valid state.
kubectl get SecretStore -A
NAMESPACE   NAME               AGE    STATUS   CAPABILITIES   READY
default     remote-k8s-store   129m   Valid    ReadWrite      True
Create ExternalSecret resource in Cluster 2
Now that we have the SecretStore configured, we can create an ExternalSecret resource in Cluster 2 to synchronize the secret from Cluster 1.
Before adding ExternalSecret resource, let’s check the secrets in Cluster 2 default namespace.
kubectl get secrets
NAME              TYPE     DATA   AGE
remote-sa-token   Opaque   1      87m
cat <<-EOF | kubectl apply -f -
apiVersion: external-secrets.io/v1beta1
kind: ExternalSecret
metadata:
  name: eso-kubernetes-secret
  namespace: default #target-namespace
spec:
  secretStoreRef:
    kind: SecretStore
    name: remote-k8s-store
  target:
    name: pulled-secrets
  data:
    - secretKey: username
      remoteRef:
        key: user-credentials
        property: username
EOF
Verify the ExternalSecret resource, Status should be Ready and SecretSynced.
 kg ExternalSecret
NAME                    STORETYPE     STORE              REFRESH INTERVAL   STATUS         READY
eso-kubernetes-secret   SecretStore   remote-k8s-store   1h                 SecretSynced   True
Check the Events in default namespace, it should show the SecretSynced event.
kubectl get events
LAST SEEN   TYPE     REASON    OBJECT                                 MESSAGE
2m40s       Normal   Created   externalsecret/eso-kubernetes-secret   secret created
42s         Normal   Created   externalsecret/eso-kubernetes-secret   secret created
4m12s       Normal   Valid     secretstore/remote-k8s-store           store validated
Verify the synchronized secret in Cluster 2
Now, let’s check if the secret has been synchronized to Cluster 2. You should see a new secret named pulled-secrets in the default namespace.
kubectl get secrets
NAME              TYPE     DATA   AGE
pulled-secrets    Opaque   1      78s
remote-sa-token   Opaque   1      90m
verify the content of the secret.
kubectl get secret pulled-secrets -o jsonpath='{.data.username}' | base64 --decode
peter
To sync these secrets across multiple kubernetes clusters, you can use CD tools like Fleet, ArgoCD or Flux to automate the deployment of ExternalSecret resources in multiple clusters.
Conclusion:
In this guide, we demonstrated how to use the External Secrets Operator (ESO) to synchronize secrets between two Kubernetes clusters. By leveraging ESO, you can securely share secrets across clusters or environments without duplicating sensitive data.
We covered:
- Deploying ESO in Cluster 2 to consume secrets from Cluster 1.
- Configuring RBAC in Cluster 1 to allow secure access to secrets.
- Setting up a SecretStore and ExternalSecret resource to synchronize secrets.
- Validating the synchronization process and verifying the secrets in Cluster 2.
This approach simplifies secret management in multi-cluster environments and ensures that secrets remain consistent and secure. Whether you’re managing secrets across development, staging, or production clusters, ESO provides a powerful and flexible solution.
Feel free to explore additional features of ESO, such as integrating with external secret management systems like AWS Secrets Manager or HashiCorp Vault. For more details, refer to the External Secrets Operator Documentation
Happy Kubernetes-ing! 🚀